This is in regards to using SurvCE 2.56 or higher with a Leica Viva GS10, GS14 or GS15 GPS receiver.
An OWI Authorization code must be purchased from Leica GeoSystems before you can use your GPS equipment with SurvCE
software.
You can click the link below for detailed instructions from Leica in regards to Activating your OWI license in your GS10
or GS15 GPS receiver:
Leica Viva - OWI Authorization.pdf
To use a Leica Viva CS15 w/ SurvCE 2.56 and an SLG1 snap-on modem with an AT&T sim chip you can follow the steps below:
1) Run SurvCE and tap the Equip tab then tap "GPS Rover"
2) In the Current tab set it to "Manufacturer: Leica" and "Model: Leica Viva - GS10/GS15"
3) tap the Comms tab and set it for "Type: Bluetooth" and "BT Type: Microsoft"
4) tap the Wrenches Icon next to "BT Type: Microsoft" to configure your Bluetooth devices
a. tap the "Find Receiver" button
b. power on your GPS Rover and tap the "Scan Device" button
c. now tap on the device in the Untrusted column with a grey "printer" icon next to it
d. tap the "-->" button
e. when your prompted with "Do you need to authenticate..." tap "NO"
f. on the right hand side under "Trusted" --- double-tap the "printer" icon listing
g. tap on "Active" in the pop-up menu
h. tap OK in the upper right then tap the bluetooth plug icon in the upper right
i. It should say "Bonding with Bluetooth" and return you to the Comms tab
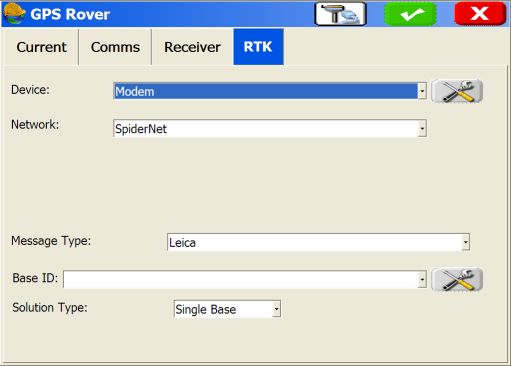
5) tap the Receiver tab to fill out your Antenna Height and Elevation mask
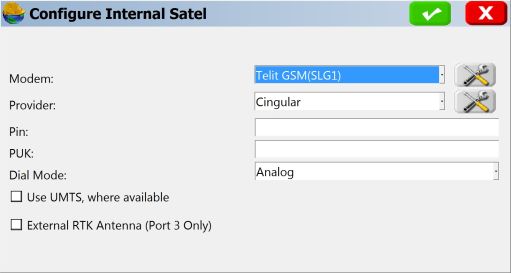
6) Then tap the RTK tab and set it to "Device: Modem" and "Network: Spidernet"
7) Tap the Wrenches Icon next to "Device: Modem" and set the "Modem:" to "Telit GSM(SLG1)"
8) Tap the Wrenches icon next to the "Provider" and type in "wap.cingular" for the APN Server and leave the Username and
Password and BLANK
9) tap the Green Check then tap the Green Check again to return to the RTK tab
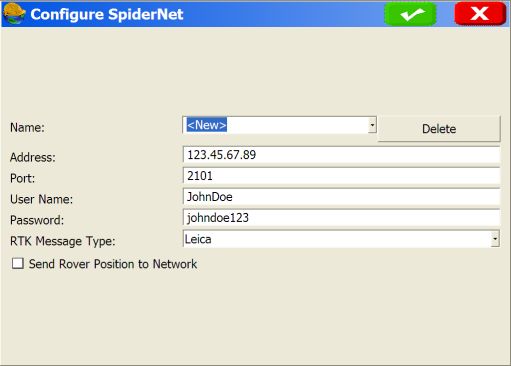
10) When you set for "Network: Spidernet" you can tap the Wrenches in the bottom right to configure your Base Network by
tapping the pulldown then tapping "" and typing in the name you want for your network. Now you can type in the IP
Address, Port, User Name and Password and select the RTK Message Type and tap the Green Check to save your settings.
This completes the first-time setup of your GPS Rover settings and you can tap the Green Check in the upper right to
configure your Rover Receiver and attempt the connection to your Spidernet Reference Network.
 ***PLEASE NOTE: if you use a Bluetooth Cellphone or Sim Chip inside the data collector This requires setting up your
cellphone connection in Leica SmartWorx before launching SurvCE. After setting up the bluetooth phone or Data Collector
Sim Chip in SmartWorx you can launch SurvCE and set Equip / GPS Rover / RTK tab to "Device: Modem" then tap the Wrenches
icon and set the "Modem:" option to "CS Smartworx" at the bottom of the list.
***PLEASE NOTE: if you use a Bluetooth Cellphone or Sim Chip inside the data collector This requires setting up your
cellphone connection in Leica SmartWorx before launching SurvCE. After setting up the bluetooth phone or Data Collector
Sim Chip in SmartWorx you can launch SurvCE and set Equip / GPS Rover / RTK tab to "Device: Modem" then tap the Wrenches
icon and set the "Modem:" option to "CS Smartworx" at the bottom of the list.